Mobile App Acceptance Testing using JavaScript on Local & BrowserStack Environments with WebDriver.IO & Appium 🚀
Acceptance testing is the process of verifying that stories were developed such that each works exactly the way the customer team expected it to work.
First of all, you must have installed all android environments. (Android Studio etc)
Hello, In this article, we will dive into mobile application testing. Before starting the tests, I would like to explain which technologies we will use and what they do.
ℹ️ TL&DR: https://github.com/muhammedikinci/wdio-appium-browserstack
👉 WebDriver.IO
WebDriver.IO is a browser and mobile automation test framework.
Also, WebDriver.IO can work with any test tool using JSON-Wire Protocol (BrowserStack, Appium). In this project, WebDriver.IO will manage our test scripts.
👉 Appium
Appium is an open source test automation framework for use with native, hybrid and mobile web apps.
Appium server and services will help us to our test scripts communicate with the app.
👉 Boilerplates
If you already know these technologies and just want a quick and safe solution, you can check repositories as specified below;
https://github.com/webdriverio/appium-boilerplate https://github.com/webdriverio/cucumber-boilerplate
Setup From Scratch
👉 Installing Modules
Let’s start by creating our working directory, then go to the directory and start WebDriver.IO
mkdir webdriverio-test
cd webdriverio-test
yarn create wdio .
After installing the dependencies, the WDIO Configuration Helper asks us some questions. You can choose the options as shown below;
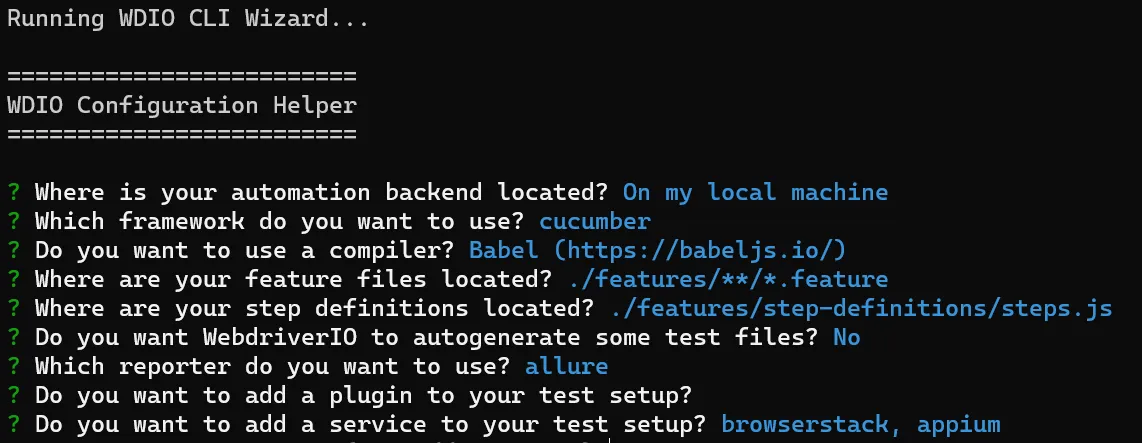
For some questions like “Service” you can select multiple options with space. (BrowserStack and Appium)
👉 Inspect Elements
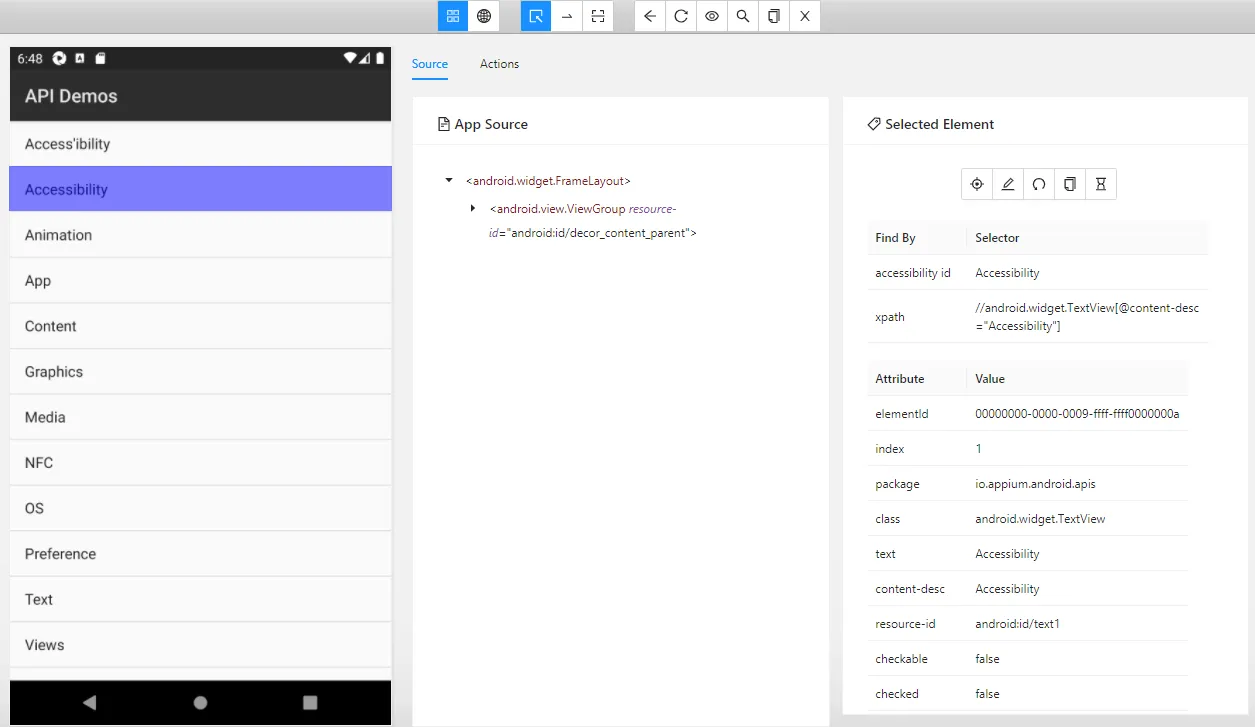
We will use Appium Inspector to see elements in the application and the API Demos APK for test purpose.
Open Appium Inspector and Android Device. Drag and drop APK to Emulator for installing the application. We enter capabilities for connecting to the Emulator from Appium Inspector you can go over this documentation.
Add the following capabilities to JSON Representation in Appium Inspector and click the save button;
{
  "platformName": "Android",
  "platformVersion": "11.0",
  "automationName": "UIAutomator2"
}
Before starting to inspect the element we need to install Appium globally and start Appium server in our local machine. Enter below commands to the terminal;
yarn global add appium
appium -pa /
Return Appium Inspector interface and click to “Start Session”. You will see a screen like the one below. Now we can get the required selectors from here.
👉 Creating Our First Test Features
Open the project and create the files and directories all shown below.
- features
  - step-definitions
    - steps.js
  - test.feature
Write the below codes for the created files;
import { Given, Then } from "@cucumber/cucumber";

Given("Click to '{}' text", async function (text) {
  let element = await $(`//android.widget.TextView[@content-desc="${text}"]`);
  await element.click();
  await browser.pause(200);
});

Then("Write to text", async function () {
  const element = await $('//*[@class="android.widget.EditText"]');
  await element.setValue("test appium");
});
Feature: Test the attributes of a given element
Scenario: Write to EditText
Given Click to 'Views' text
Given Click to 'Auto Complete' text
Given Click to '1. Screen Top' text
Then Write to text👉 Defining Configurations
Now we create a new WDIO configuration file and override some properties for local and BrowserStack environments. Create “wdio.local.conf.js” and write the below codes then move ApiDemos APK to in the same directory with “wdio.local.conf.js”;
import { config } from "./wdio.conf";
import { join } from "path";

config.maxInstances = 1;

config.capabilities = [
  {
    platformName: "Android",
    platformVersion: "11",
    orientation: "PORTRAIT",
    automationName: "UiAutomator2",
    app: join(process.cwd(), "./ApiDemos-debug.apk"),
  },
];

config.services = ["appium"];

exports.config = config;
👉 Running Tests on Local
For running tests on the local we can add this code to “scripts” in package.json and run.
"wdio:local": "wdio run wdio.local.conf.js"
yarn wdio:local
The test result must be below;
[emulator-5554 Android 11 #0-0] » \features\test.feature
[emulator-5554 Android 11 #0-0] Test the attributes of a given element
[emulator-5554 Android 11 #0-0] Write to EditText
[emulator-5554 Android 11 #0-0] ✓ Given Click to 'Views' text
[emulator-5554 Android 11 #0-0] ✓ Given Click to 'Auto Complete' text
[emulator-5554 Android 11 #0-0] ✓ Given Click to '1. Screen Top' text
[emulator-5554 Android 11 #0-0] ✓ Then Write to text
[emulator-5554 Android 11 #0-0]
[emulator-5554 Android 11 #0-0] 4 passing (6.3s)
Spec Files: 1 passed, 1 total (100% completed) in 00:00:20
2022-01-10T19:58:46.999Z INFO @wdio/local-runner: Shutting down spawned worker
2022-01-10T19:58:47.255Z INFO @wdio/local-runner: Waiting for 0 to shut down gracefully
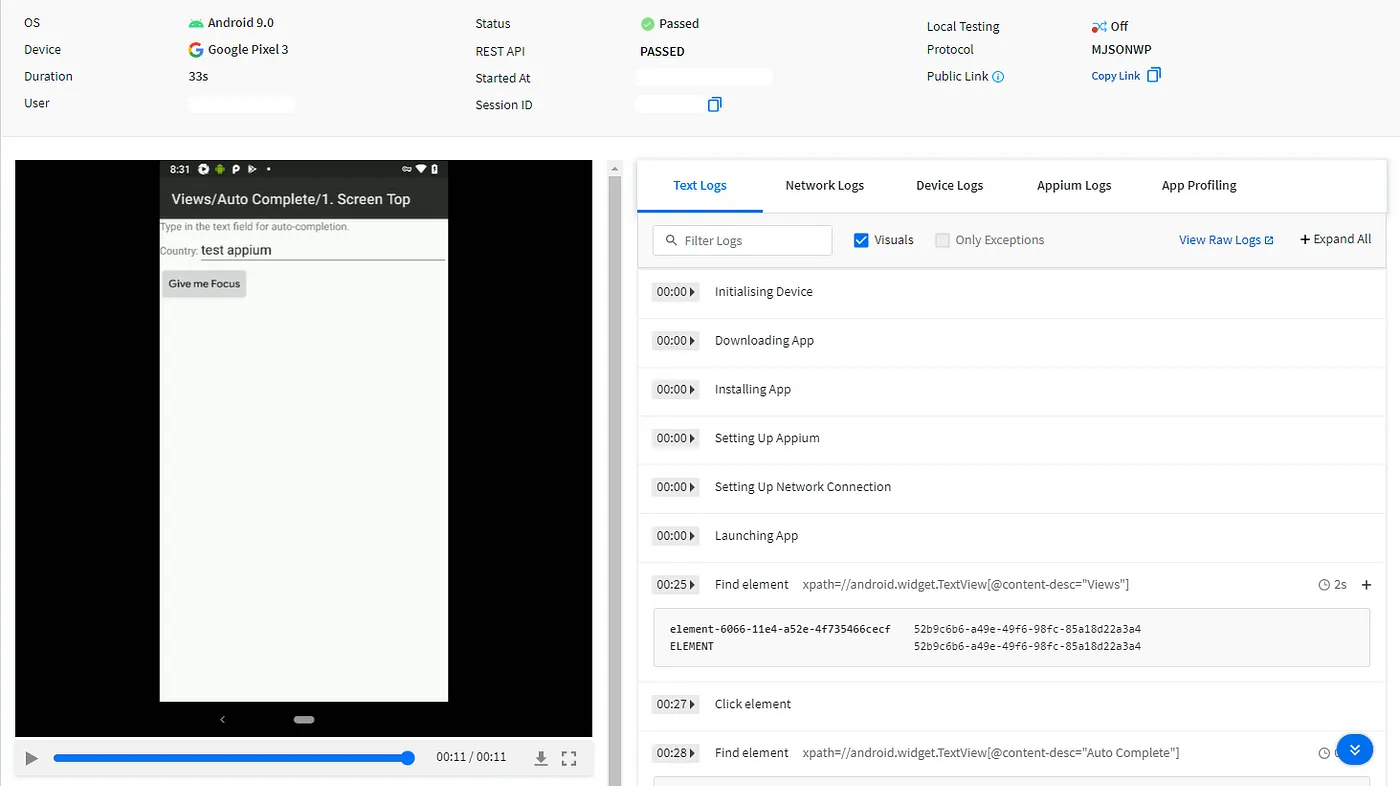
2022-01-10T19:58:47.256Z INFO @wdio/local-runner: shutting down👉 Running Test on BrowserStack
In this step, we must upload our APK to BrowserStack and get APPID. We provide APPID in the configuration file.
For upload apk;
curl -u "<username>:<access_token>" -X POST "https://api-cloud.browserstack.com/app-automate/upload" -F "file=@./ApiDemos-debug.apk"Then we get result like this:
{ "app_url": "bs://id" }import { config } from './wdio.conf'
config.user = <username>
config.key = <access_token>
config.capabilities = [
{
platformName: "Android",
os_version: "9",
deviceName: 'Google Pixel 3',
platformVersion: '9',
automationName: 'UiAutomator2',
device: "Google Pixel 3",
app: <appId>,
"browserstack.local" : false
}
]
config.services = ["browserstack"]
config.maxInstances = 1
delete config.port
exports.config = configFor running tests on the BrowserStack we can add this code to “scripts” in package.json and run.
"wdio:browserstack": "wdio run wdio.browserstack.conf.js"
yarn wdio:browserstack
And see the results on BrowserStack dashboard
TL&DR: https://github.com/muhammedikinci/wdio-appium-browserstack